
Enter items purchase
The upper section of the purchase order fields consists of:
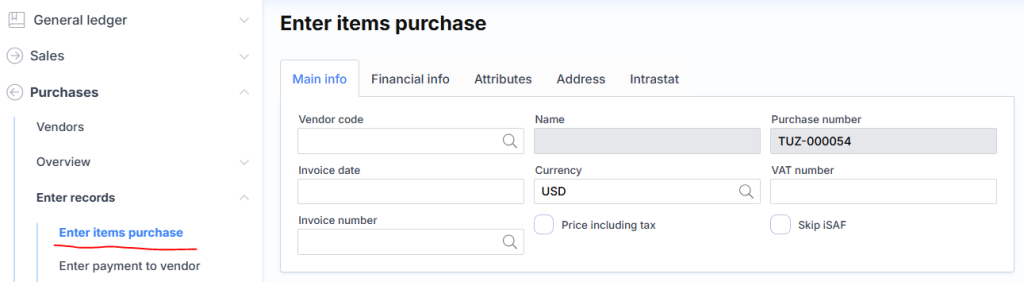
Basic Information
Supplier Code – Selectable supplier ID from whom the purchase is intended.
Invoice Date – Specifies the financial date of the transaction. This will also become the invoice date.
Invoice Number – Indicates the invoice number.
Name – Displays the supplier’s name.
Currency – The currency code of the transaction.
Prices Include VAT – Checkbox to indicate whether entered prices and amounts should be interpreted as VAT-inclusive. If unchecked, a purchase amount of €100 with a 21% VAT rate results in a total of €121. If checked, the same €100 is treated as the VAT-inclusive total. The net amount is calculated as €82.65 and VAT as €17.35.
Purchase No. – System-generated purchase order number.
VAT Code – Displays the supplier’s VAT payer code. If not specified in the supplier’s profile but entered here, it will automatically be saved to the supplier’s profile.
Skip iSAF – Checkbox to exclude the registered invoice from the iSAF registry.
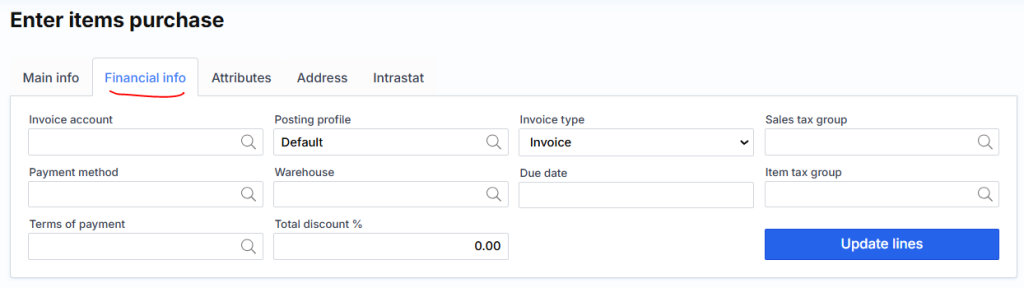
Financial Information
- Invoice account – Specifies the supplier (may differ from the “Supplier Code” field) to whom the invoice is financially registered. Example: One supplier delivers, but payment is made to another.
- Posting profile – Registers the supplier’s portion to the general ledger account.
- Payment Method – Indicates how the supplier will be paid.
- Payment Terms – Defines how the “Due Date” is calculated.
- Due Date – Manually entered payment deadline.
- Sales tax group – Customer/supplier VAT code used when creating order lines.
- Invoice Type – Specifies the type that is transferred to the iSAF registry.
- Total discount % – Discount percentage applied to the entire order.
- Warehouse – Suggested warehouse when creating order lines.
- Item VAT Group – Suggested item VAT code when creating order lines.
Button Update Lines when pressed, the system will update all order lines with the specified Warehouse, VAT Group, and Item VAT Group.
🏷️ Attributes
- Division – Attribute assigned to the supplier’s portion indicating the division.
- Project – Attribute assigned to the supplier’s portion indicating the project.
- Product – Attribute assigned to the supplier’s portion indicating the product.
If no corresponding attribute is specified in the invoice line, it will be copied from this section.
📦 Delivery Address
- Street – Select or enter the delivery street.
- City – Select or enter the delivery city.
- Country – Select or enter the delivery country.
- Postal Code – Select or enter the delivery postal code.
- Delivery Terms – Select delivery terms. This field is relevant for generating Intrastat reports.
📊 Intrastat
- Transaction Code – Select the Intrastat transaction code (e.g., 21 – goods return).
- Transport – Select the Intrastat transport code (e.g., 3 – road transport).
- Port – Select the Intrastat port code.
- Statistical Procedure – Select the Intrastat statistical procedure.
⚠️ Note: Before entering a purchase line, a product card must be created.
Purchase Order Lines Include the Following Fields:

Purchase Order Line Fields
- Item – Select the item code you wish to purchase.
- Name – Select or enter the item name.
- Unit – Select the unit of measure for the item (e.g., kg).
- Quantity – Enter the quantity of the item.
- Price – Enter the item price.
- Discount % – Enter the discount percentage.
- Amount – Enter or automatically calculate the total amount.
- Warehouse – Select the warehouse from which the item will be deducted.
- Serial Number – Enter or select the serial number.
- Package – Enter or select the package number (e.g., expiration date).
⚠️ Note: Fields Warehouse, Serial Number, and Package may be hidden depending on system settings.
- Item VAT Group – Select the VAT code for the item.
🔄 Calculation Behavior
- When quantity and price are entered, the amount is calculated automatically.
- Alternatively, you can enter quantity and amount, and the price will be calculated.
- If the result is a “non-rounded” number (e.g., quantity = 3, amount = 2), the price field may remain empty.
🖱️ Icons and Their Functions
| Icon | Function |
|---|---|
| Opens line editing mode | |
| Deletes the line | |
| Opens the attribute assignment window | |
| Changes line order (order is retained in printed invoice) | |
| Opens the additional expenses editing/view window | |
| Adds a new order line |
📌 Sorting Tip
If there are many lines, you can sort them by clicking on a field name (e.g., Quantity).
⚠️ This sorting only works in preview mode and does not affect the printed invoice layout.
Bottom Section Buttons:
⬇️ Bottom Section – Typical Buttons
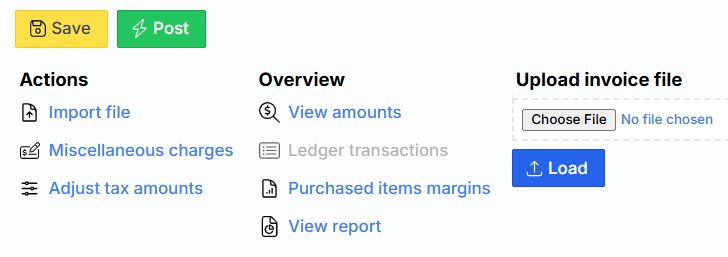
Post – Financially posts the order (records it in the general ledger and related modules) and generates the invoice.
Save – Saves the order data to the server.
⚠️ Note
In the form that opens after clicking Post, you can specify a Document Date that differs from the posting date. This is useful, for example, when registering a lost invoice into a period that has already been closed. In such cases, the invoice data will still be correctly transferred to the iSAF registry.
🧩 Other Buttons
- Import File – Allows importing order lines from a text file. The file must contain the following columns: Item Code, Name, Quantity, Amount, Warehouse.
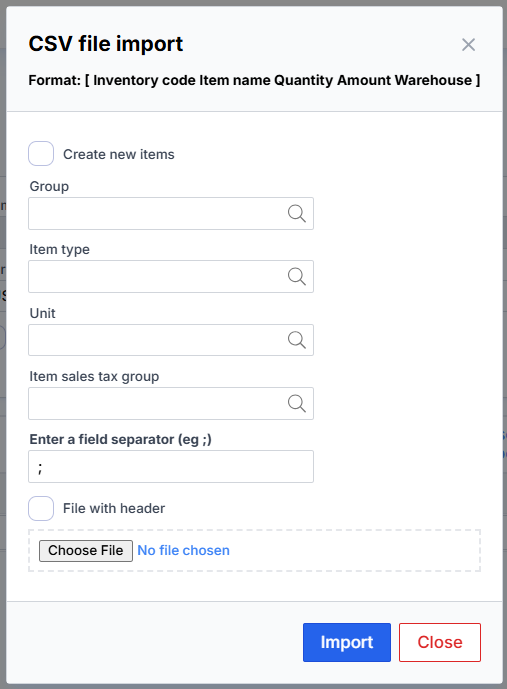
📥 Import Options
- Create New Items – In the import form, you can choose to automatically create item cards when the system detects a new item.
- Group – Specifies the item group for newly created item cards.
- Item Type – Specifies the item type for newly created item cards.
- Unit – Specifies the unit of measure for newly created item cards.
- File with Header – Check this box if the file contains column headers above the data. In this case, the first row will be ignored during import.
💸 Additional Costs
- Additional Expenses – Opens a window where you can increase or decrease item cost prices using amounts from the same invoice (e.g., delivery fee or overall discount) or from another invoice (e.g., customs duty or delivery costs from a separate invoice). More details about additional expenses are available in the linked section.
🧾 Adjust VAT Amounts
Adjust VAT Amounts – Allows manual correction of the VAT amount calculated by the system.
The opened form displays VAT code calculations per line item.
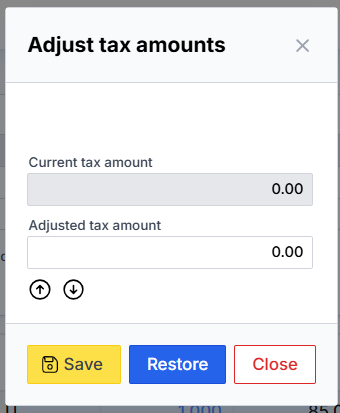
🧾VAT Adjustment
- Current VAT Amount – Displays the currently applied VAT.
- Adjusted VAT Amount – Allows you to enter a new VAT amount, which will be applied after clicking Save.
- If you make a mistake or want to cancel the adjustment, click Reset.
- Use the arrow buttons to increase or decrease the adjusted VAT by one cent.
📊 View Totals
- View Totals – Displays various totals for the entire order, including:
- Additional Expenses
- Additional Expenses from Another Invoice
- Amount
- VAT
- Discounts
- Rounding
- Final Total
📘 General Ledger Operations
- GL Operations – After posting, shows the generated general ledger entries related to this order.
📈 Sales Margin Report
- Purchased Item Sales Margins – Generates a report showing the potential margin compared to the sales price specified in the item card.
🧾 Generate Invoice Printout
- Generate Printout – Creates a printable invoice view in a separate window.
📤 Upload Invoice File
- Upload Invoice File – Allows uploading a scanned image file of the invoice.
🔍 Note
Unposted purchase entries can be found and reviewed via: Menu → Purchases → Overwiev→ Purchase Journals